


Back in August of 2025, I shared one of my favorite meals: fried sushi. Within a few hours, I realized a lot of y’all had never tried it before. The comments started rolling in: “Black people fry everything 😭✊🏾” and “I never thought about using a Ziplock!” These comments had me cracking up, but it also made me want to slow down and talk about the history of sushi and the influence of Black culture on Asian-inspired foods. So let’s get into it.
Is Fried Sushi A “Black People Thing”?
“I don’t care who’s thing it is. I want it in my mouth.”
-Threads Comment


Sushi originated in Japan, with its earliest forms dating back to around the 8th or 9th century. Historically, it began as Narezushi, a method of preserving fish by wrapping it in salted, fermented rice. Interestingly, the rice was originally thrown away and only the fish was eaten! Over time, sushi evolved into the Edomae-style we recognize as traditional Japanese sushi today, centering on precision, balance, and high-quality raw ingredients.
Now… fried sushi? That comes much later, and it doesn’t belong to one single culture.
In the 20th century, sushi began traveling globally through immigration, trade, and cultural exchange. By the mid-to-late 1900s, sushi had made its way to the United States, where it started to evolve to fit American tastes, ingredients, and dining culture.
That’s where things really changed.
American sushi culture gave us rolls stuffed with cream cheese, drizzled with spicy mayo and eel sauce, and topped with crunchy tempura. That’s not a “Black people thing”, it’s an Americanized sushi thing.
That said, Black folks absolutely know how to take food and put our own spin on it. When people see fried sushi and immediately say, “Black people fry everything,” it’s less about accuracy and more about stereotypes mixed with humor. We fry food because of cultural roots, creativity, and because it tastes good.
My first time ever trying fried sushi was at an all-you-can-eat spot in Tulsa, Oklahoma, called Sake2Me Sushi. I remember loading my plate with both traditional rolls and fully fried ones. Now, every time my fiancé and I go on sushi dates, I always order at least one fried roll. It’s a must.


Ziplock Rolling Trick
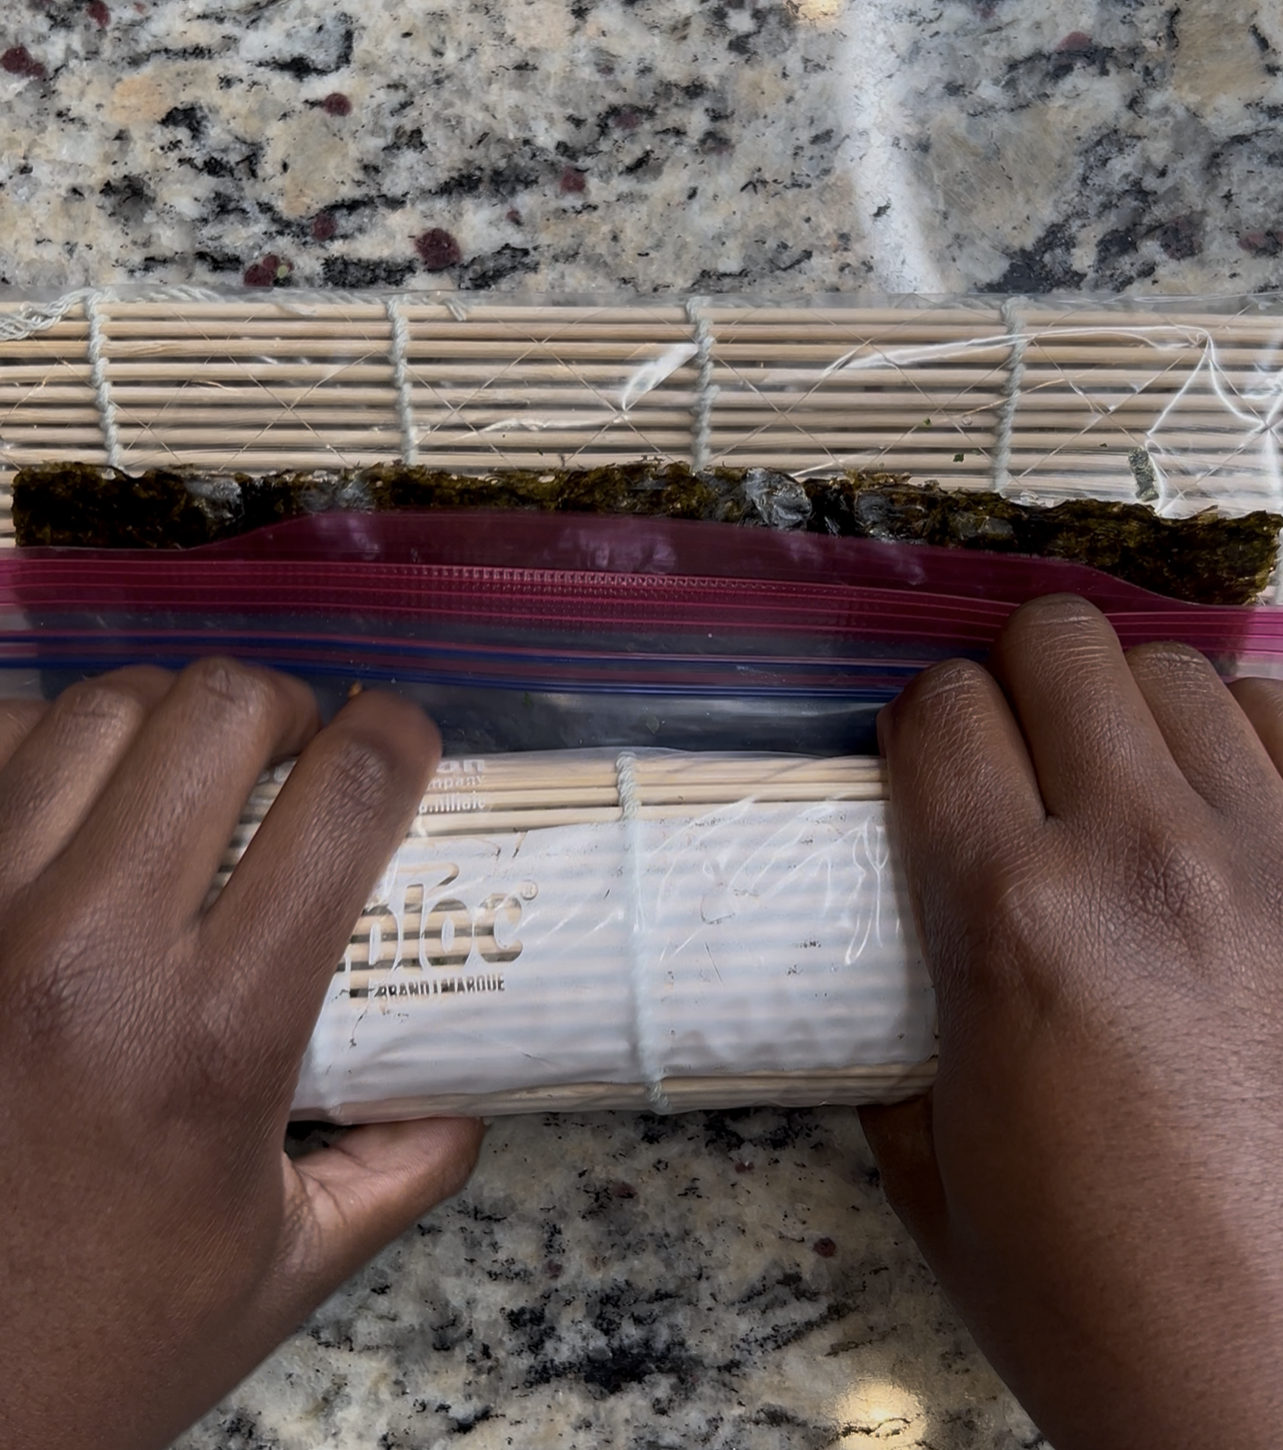
I learned this trick from the world’s favorite unpaid teacher: YouTube. Grab a gallon-sized Ziplock bag and slide your bamboo roller into the bag. Push out all the air then seal the zipper. This trick will make rolling your sushi so so so much easier and now you don’t have to worry about cleaning that bamboo mat!
“Who showed you that wrapping trick, i like thatt 🤏🏾🤏🏾🤏🏾🤏🏾🤏🏾 clock it”
– Instagram Comment

Fried Sushi Ingredients
- Sushi Rice: I love using jasmine rice, rice vinegar, salt, and sugar.
- Nori Paper: The dried seaweed base that holds your roll together.
- Shrimp: Seasoned with Old Bay and a little salt.
- Cream Cheese: I use Philadelphia brand, cut into long strips.
- Cucumber, Jalapeño, & Avocado: Sliced thin.
- Furikake: A Japanese seasoning blend.
- Tempura Batter: I love using the Mr. Hung Tempura Batter Mix.
- Beef Tallow: My secret for the best frying results and flavor.
How to Make the Fried Sushi
To get that perfect texture, I recommend using day-old rice. I slightly dampen it with water and warm it up for 20-30 seconds. You don’t want it piping hot, but just warm enough so the grains aren’t clumped together. Once your rice is ready, mix in your vinegar, salt, and sugar.
Before you start rolling, prep your shrimp by seasoning them with Old Bay and a little salt, dipping them in tempura batter, and frying them in beef tallow until they are golden and crispy.
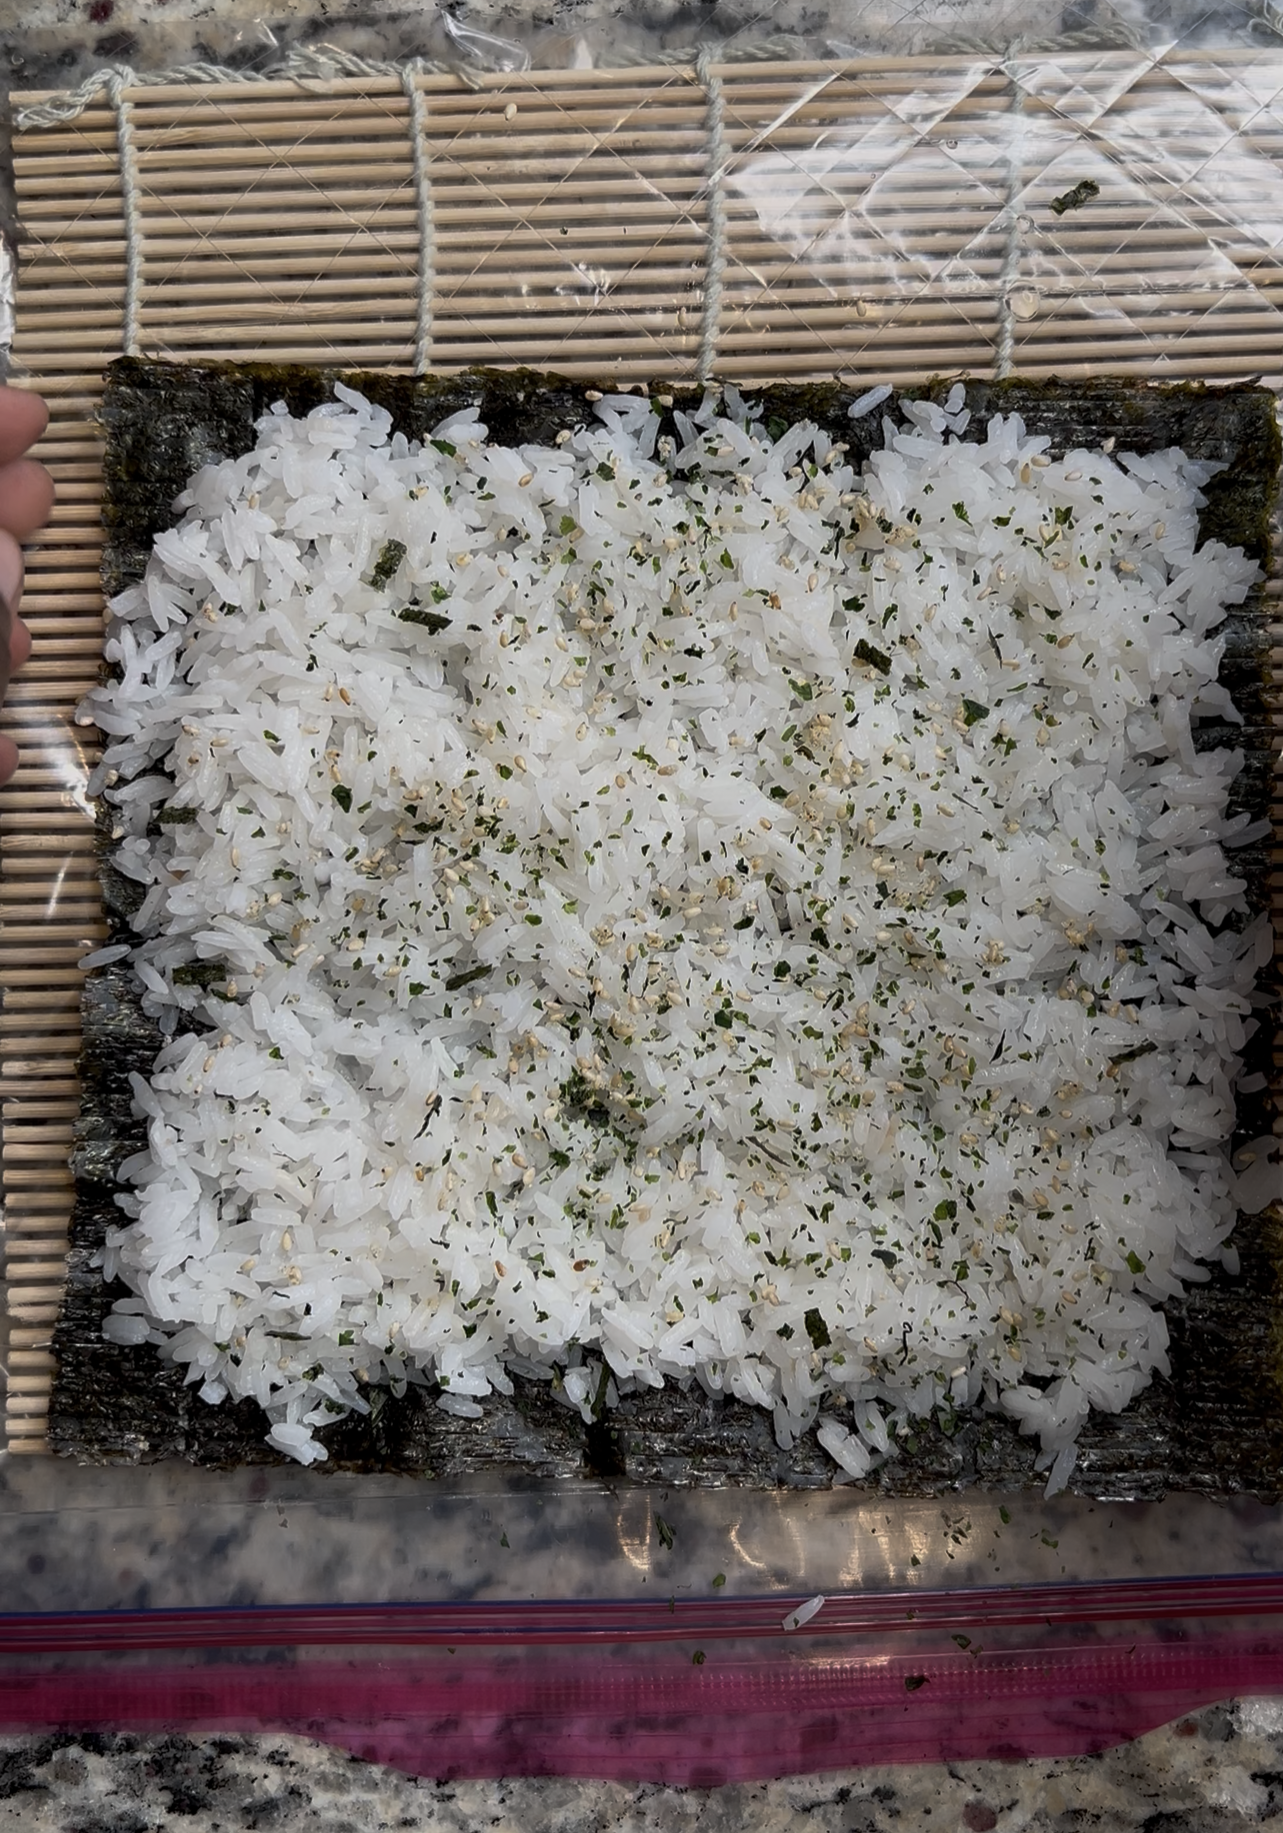
Now, lay your nori paper flat (shiny side down) on your sushi mat. Dip your fingers in water to keep the rice from sticking, then spread a thin, even layer across the nori. Sprinkle that Furikake all over the rice for flavor. Now, here is the most important part: carefully pick up the nori paper and flip it over so the rice is facing down on the mat. This puts the rice on the outside, which is what gives you that massive crunch once we fry it.

On the “naked” seaweed side, add a row of cream cheese, 4-5 pieces of the fried shrimp, and your slices of jalapeño, cucumber, and avocado.
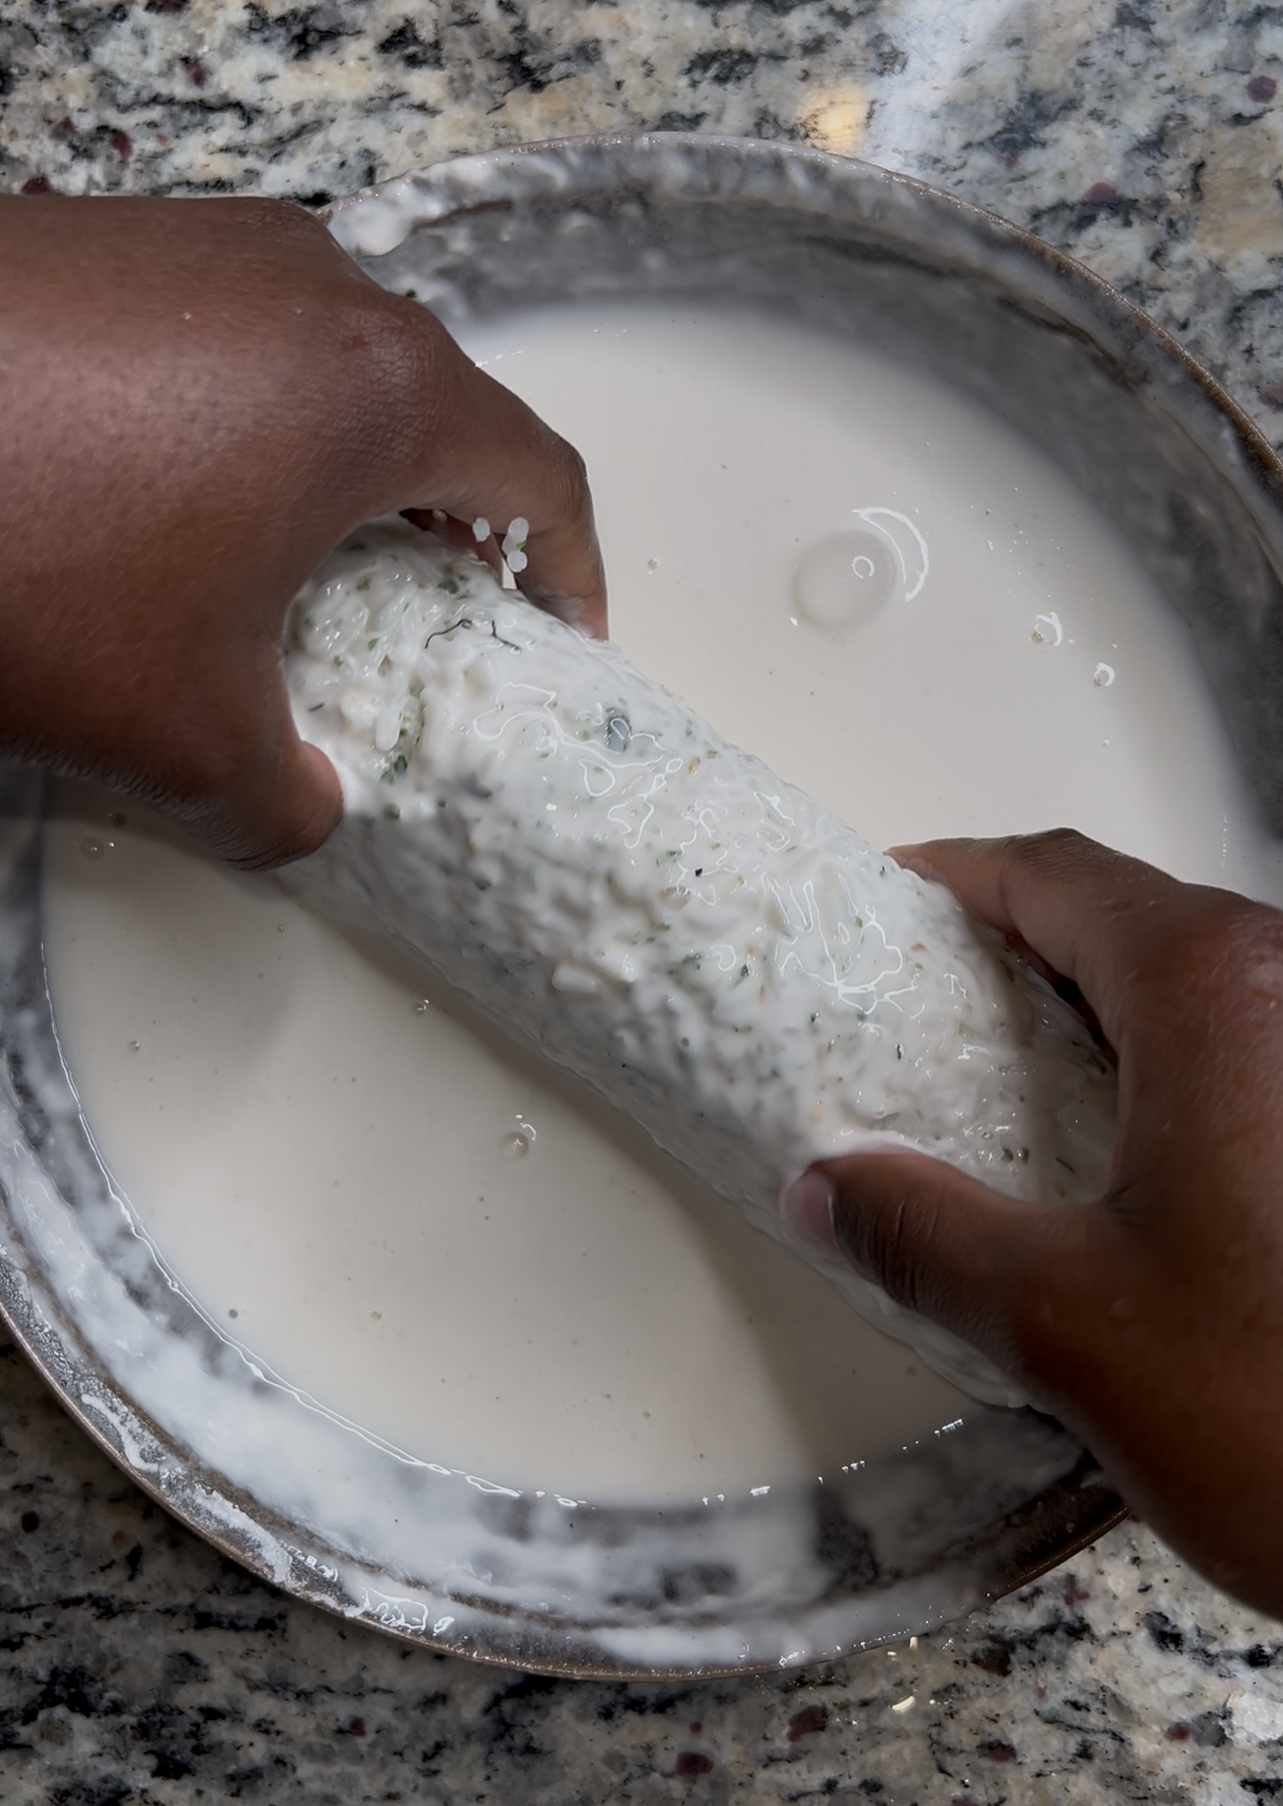
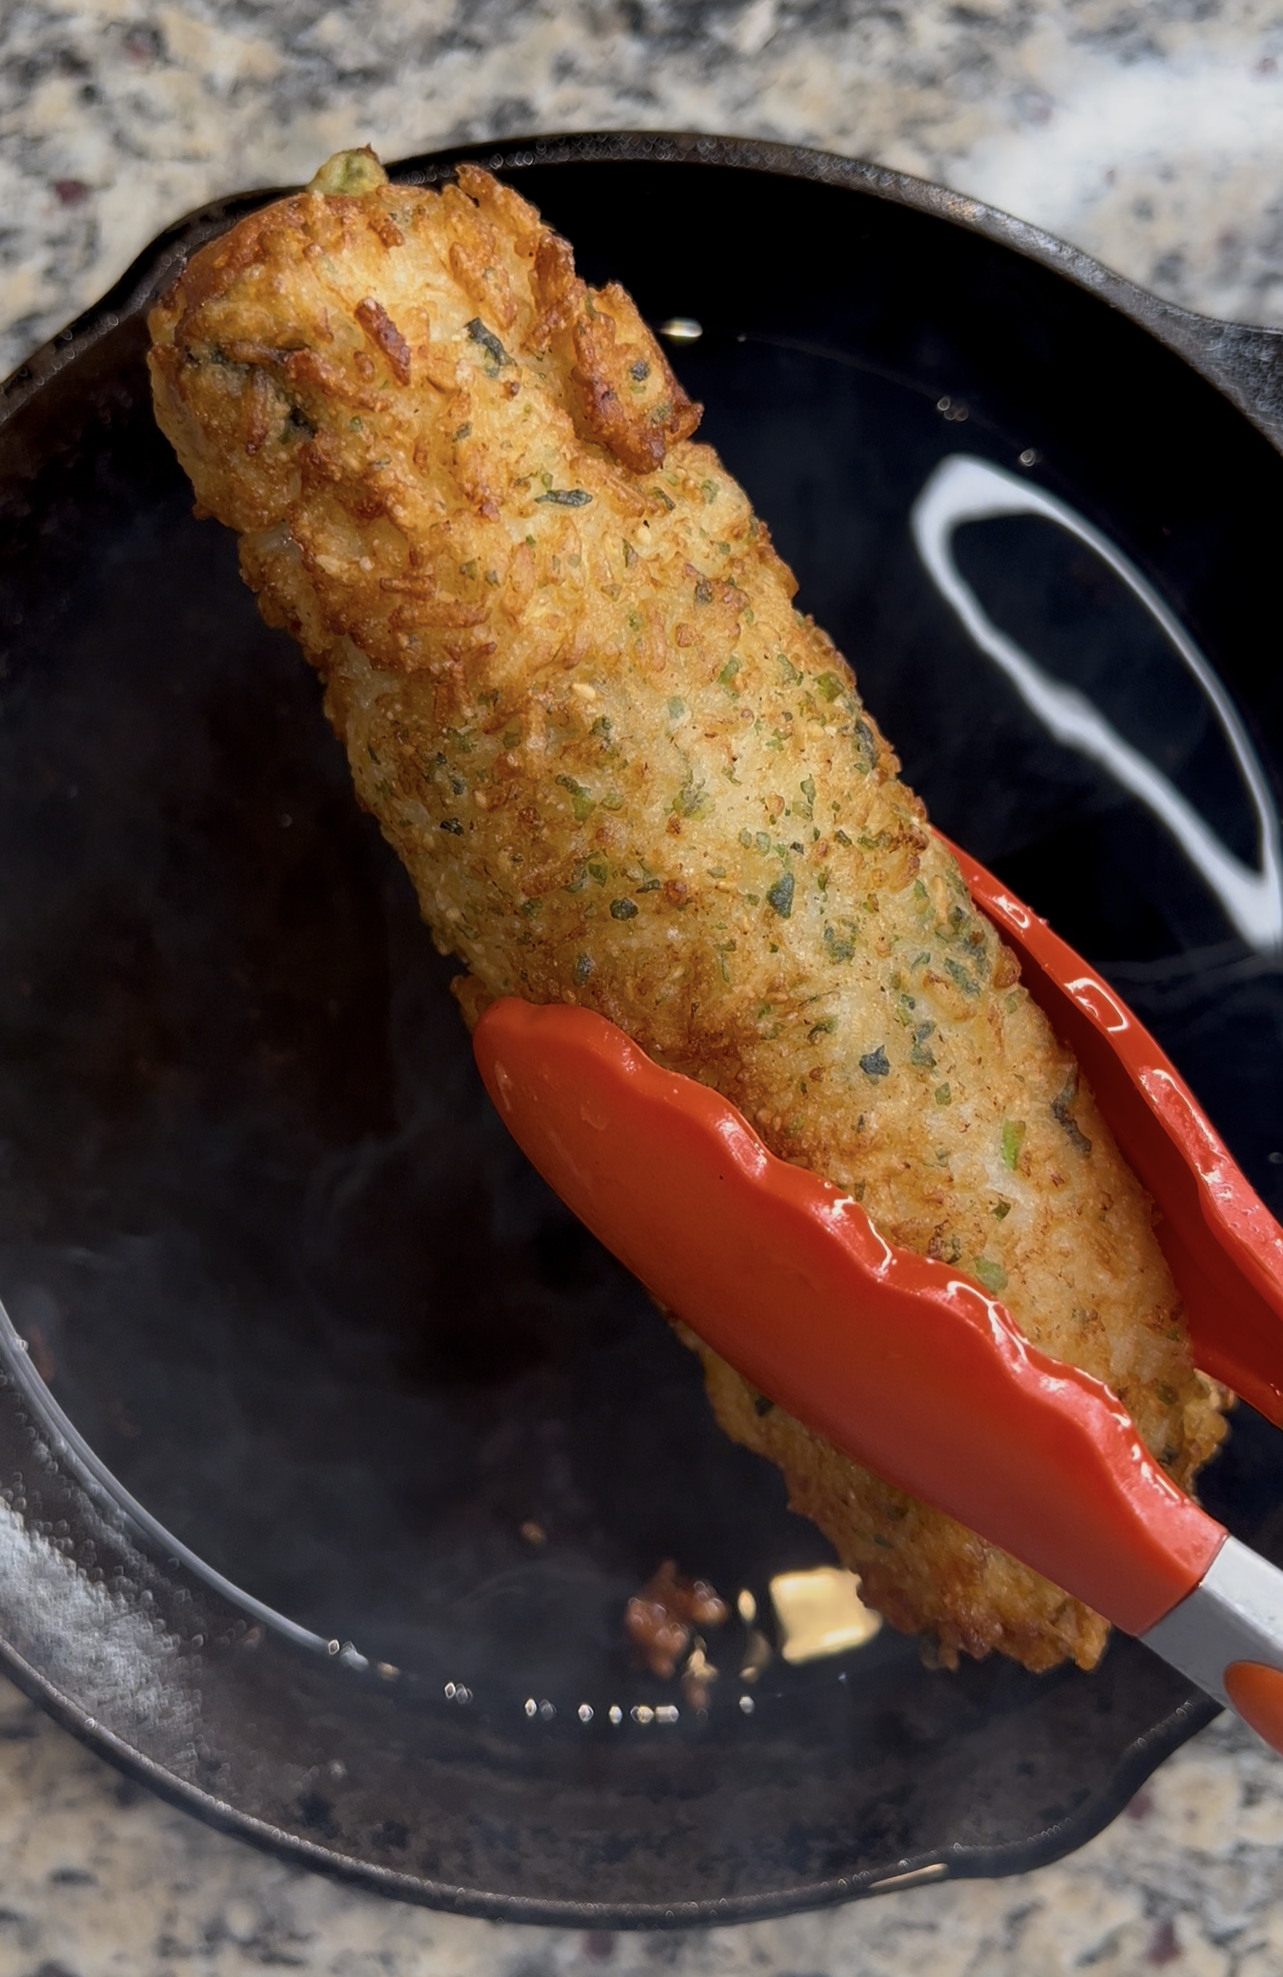
Tuck it tightly and give it a firm squeeze after every turn. Once you have a solid roll, dip the entire thing into your tempura batter (make sure it’s a pancake-like consistency!) until it’s fully covered. Shake off any extra batter and carefully place it into your hot beef tallow in a cast iron skillet. Let it fry until it’s golden on all sides, flipping every few minutes.


Finally, remove it from the grease and let it drain on a wire rack. Let it cool completely before you even think about touching it with a knife! Once it’s set, slice it up and drizzle generously with eel sauce and spicy mayo.


Tips For Best Fried Sushi
- Don’t slice the rolls until they’ve cooled! Your rolls will fall apart and will look an absolute mess if you don’t let them rest. Ask me how I know.
- Roll them tight and squeeze after each tuck. This will help ensure the roll doesn’t fall apart when it hits the oil.
- Don’t use fresh rice! Rice fresh out of the rice cooker will be hard to work with and will likely have a mushy texture after frying. If you are using fresh rice, I suggest laying it out on a pan and letting it cool completely before using.
- Try the classic version: Some days you want that extra crunch, and some days you want it fresh and simple. If you decide you’d rather keep the rice on the inside and skip the deep fry, I’ve got a Shrimp Tempura Sushi Roll recipe you have to try!
Variations & Substitutions
One of my favorite things about fried sushi is how easy it is to make it your own! Don’t be afraid to get creative and use whatever fillings you love. If shrimp isn’t your thing, try one of these delicious alternatives:
- Fried chicken: Crispy fried chicken or breaded chicken breast makes an amazing substitute. It’s a great option if you’re allergic to seafood, don’t eat fish, or are pregnant and prefer to avoid seafood.
- Fish: If you prefer fish over shrimp, feel free to swap in your favorite cooked fish instead.
- Imitation crab: This is another popular option that adds a slightly sweet, seafood flavor without using shrimp.
Fun Ways to Serve Sushi
Presentation is another fun way to elevate this recipe! To celebrate hitting 11,000 followers on TikTok, I served my fried sushi on a sushi boat decorated with tropical flowers and palm leaves. It made the whole spread feel so fun and elevated. If you’re serving this for a party, date night, or family dinner, I highly recommend giving it a try!


Fried Sushi
Description
This is the recipe that started it all. After sharing my love for fried sushi on social media, I realized how many people had never seen it done this way. It’s a crispy, deep-fried roll packed with fried tempura shrimp, jalapeño, and cream cheese. If you’re looking for that specific "American-style" sushi that’s crunchy, warm, and savory, this is exactly how I make it.
Ingredients
Instructions
-
Dampen day-old rice with a little water and microwave for 20-30 seconds. Mix in the rice vinegar, salt, and sugar until the grains separate easily but aren't piping hot.
-
Season shrimp with Old Bay and salt. Dip in tempura batter and fry in beef tallow until golden. Set aside.
-
Slide your bamboo sushi mat into a gallon-sized Ziplock bag and seal it to prevent the rice from sticking to the wood.

-
Place a nori sheet flat on the mat. Using wet fingers, spread an even layer of rice across the entire sheet and sprinkle with Furikake.
-
Carefully flip the nori paper over so the rice side is facing down against the Ziplock bag. This ensures the rice is on the outside for the fry.
-
On the "naked" seaweed side, place a row of cream cheese, 4-5 fried shrimp, and slices of jalapeño, cucumber, and avocado.

-
Roll the sushi away from you, tucking the edge tightly and giving it a firm squeeze after each turn to ensure it stays together.
-
Submerge the entire sushi roll in tempura batter (pancake-mix consistency) until fully coated. Shake off any excess.
-
Fry the entire roll in a cast iron skillet with beef tallow at 175°C (350°F). Flip every few minutes until golden brown on all sides.
-
Place the roll on a wire rack to drain. Let it cool completely for at least 10 minutes before slicing with a sharp, wet knife. Drizzle with sauces and serve.

Nutrition Facts
- Amount Per Serving
- Calories 650kcal
- % Daily Value *
- Total Fat 32g50%
- Saturated Fat 12g60%
- Cholesterol 115mg39%
- Sodium 980mg41%
- Total Carbohydrate 68g23%
- Dietary Fiber 4g16%
- Sugars 8g
- Protein 22g44%
* Percent Daily Values are based on a 2,000 calorie diet. Your daily value may be higher or lower depending on your calorie needs.


Thank you so so much yess!!
You’re so welcome!